
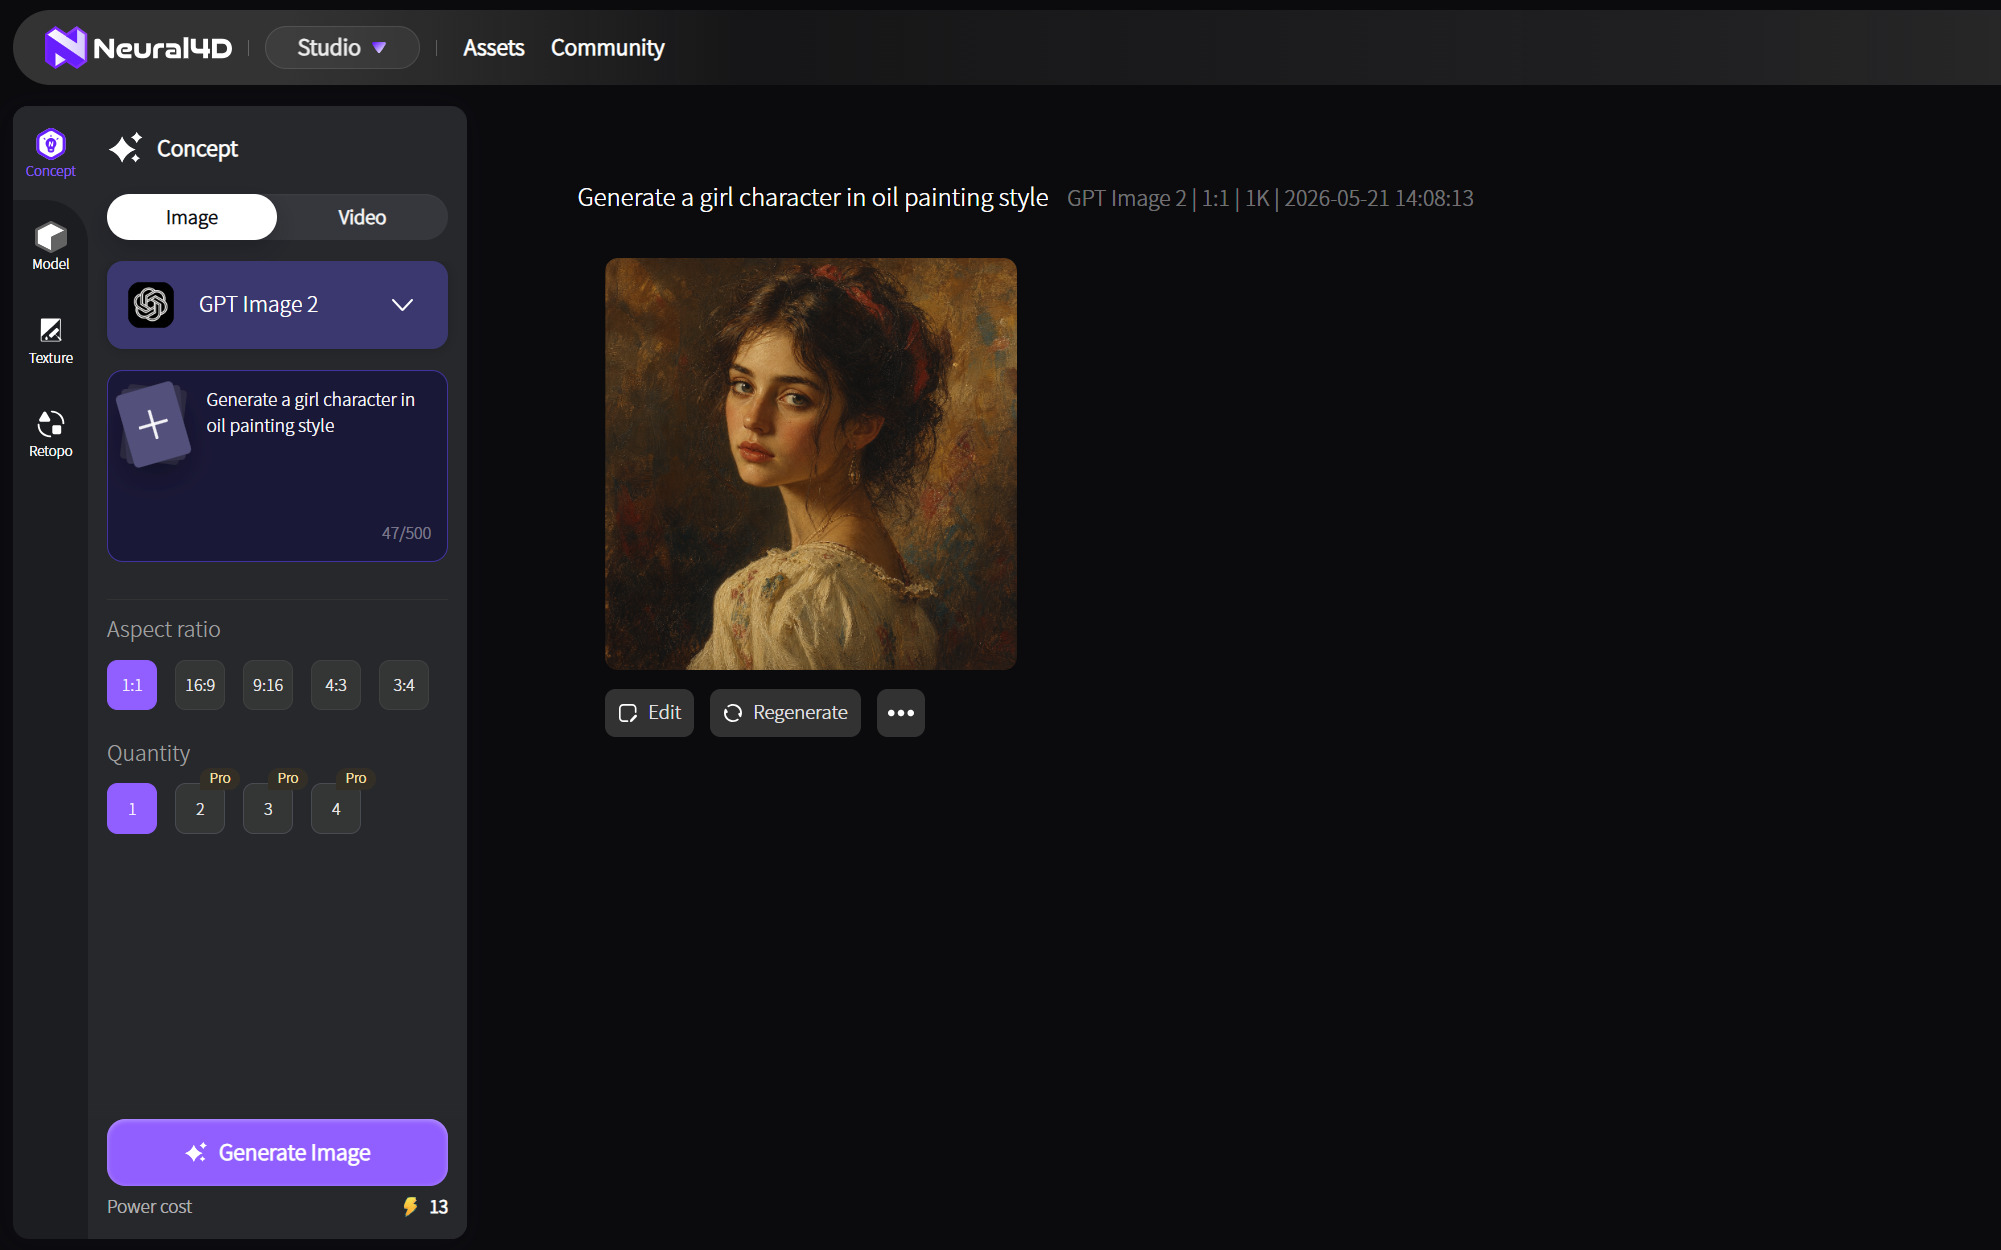
Text to Image is a standalone 2D generation tool inside Neural4D Studio. You type a prompt, pick a model, and the system returns a high-fidelity image in seconds. It operates independently of the 3D pipeline: no mesh is created, no watertight geometry is involved. The output is a lossless .png file ready for design, print, or social media use.
Two generation engines are available: GPT Image 2 for complex, style-rich illustrations, and Nano Banana Pro for photorealistic, fast-turnaround visuals. Both engines are accessible from the same interface with no mode switching required.
The model you select determines the rendering style and output speed. Use the table below to match the right engine to your production goal.
| Model | Best For | Rendering Style | Typical Use Case |
|---|---|---|---|
| GPT Image 2 | Complex prompt alignment | Stylized, illustrative | Concept art, character drafts, scene composition |
| Nano Banana Pro | High-fidelity photorealism | Photorealistic | Product renders, furniture mockups, marketing visuals |
For independent creators producing e-commerce product images or furniture design mockups, Nano Banana Pro delivers clean, studio-grade results. For game developers drafting NPC concept art or environment references, GPT Image 2 handles nuanced style prompts with greater fidelity.
The full generation cycle takes under one minute. Follow these four steps:

See how to utilize Neural4D Studio to generate professional-grade assets in seconds. This quick walkthrough covers the core capabilities of our creative suite:
Neural4D Text to Image supports a range of preset aspect ratios to fit standard production formats:
Variation count can be set to 1, 2, 3, or 4 images per generation run. All outputs are delivered as lossless .png files, preserving pixel-level color accuracy for downstream editing in tools like Photoshop, Figma, or print-ready export workflows.
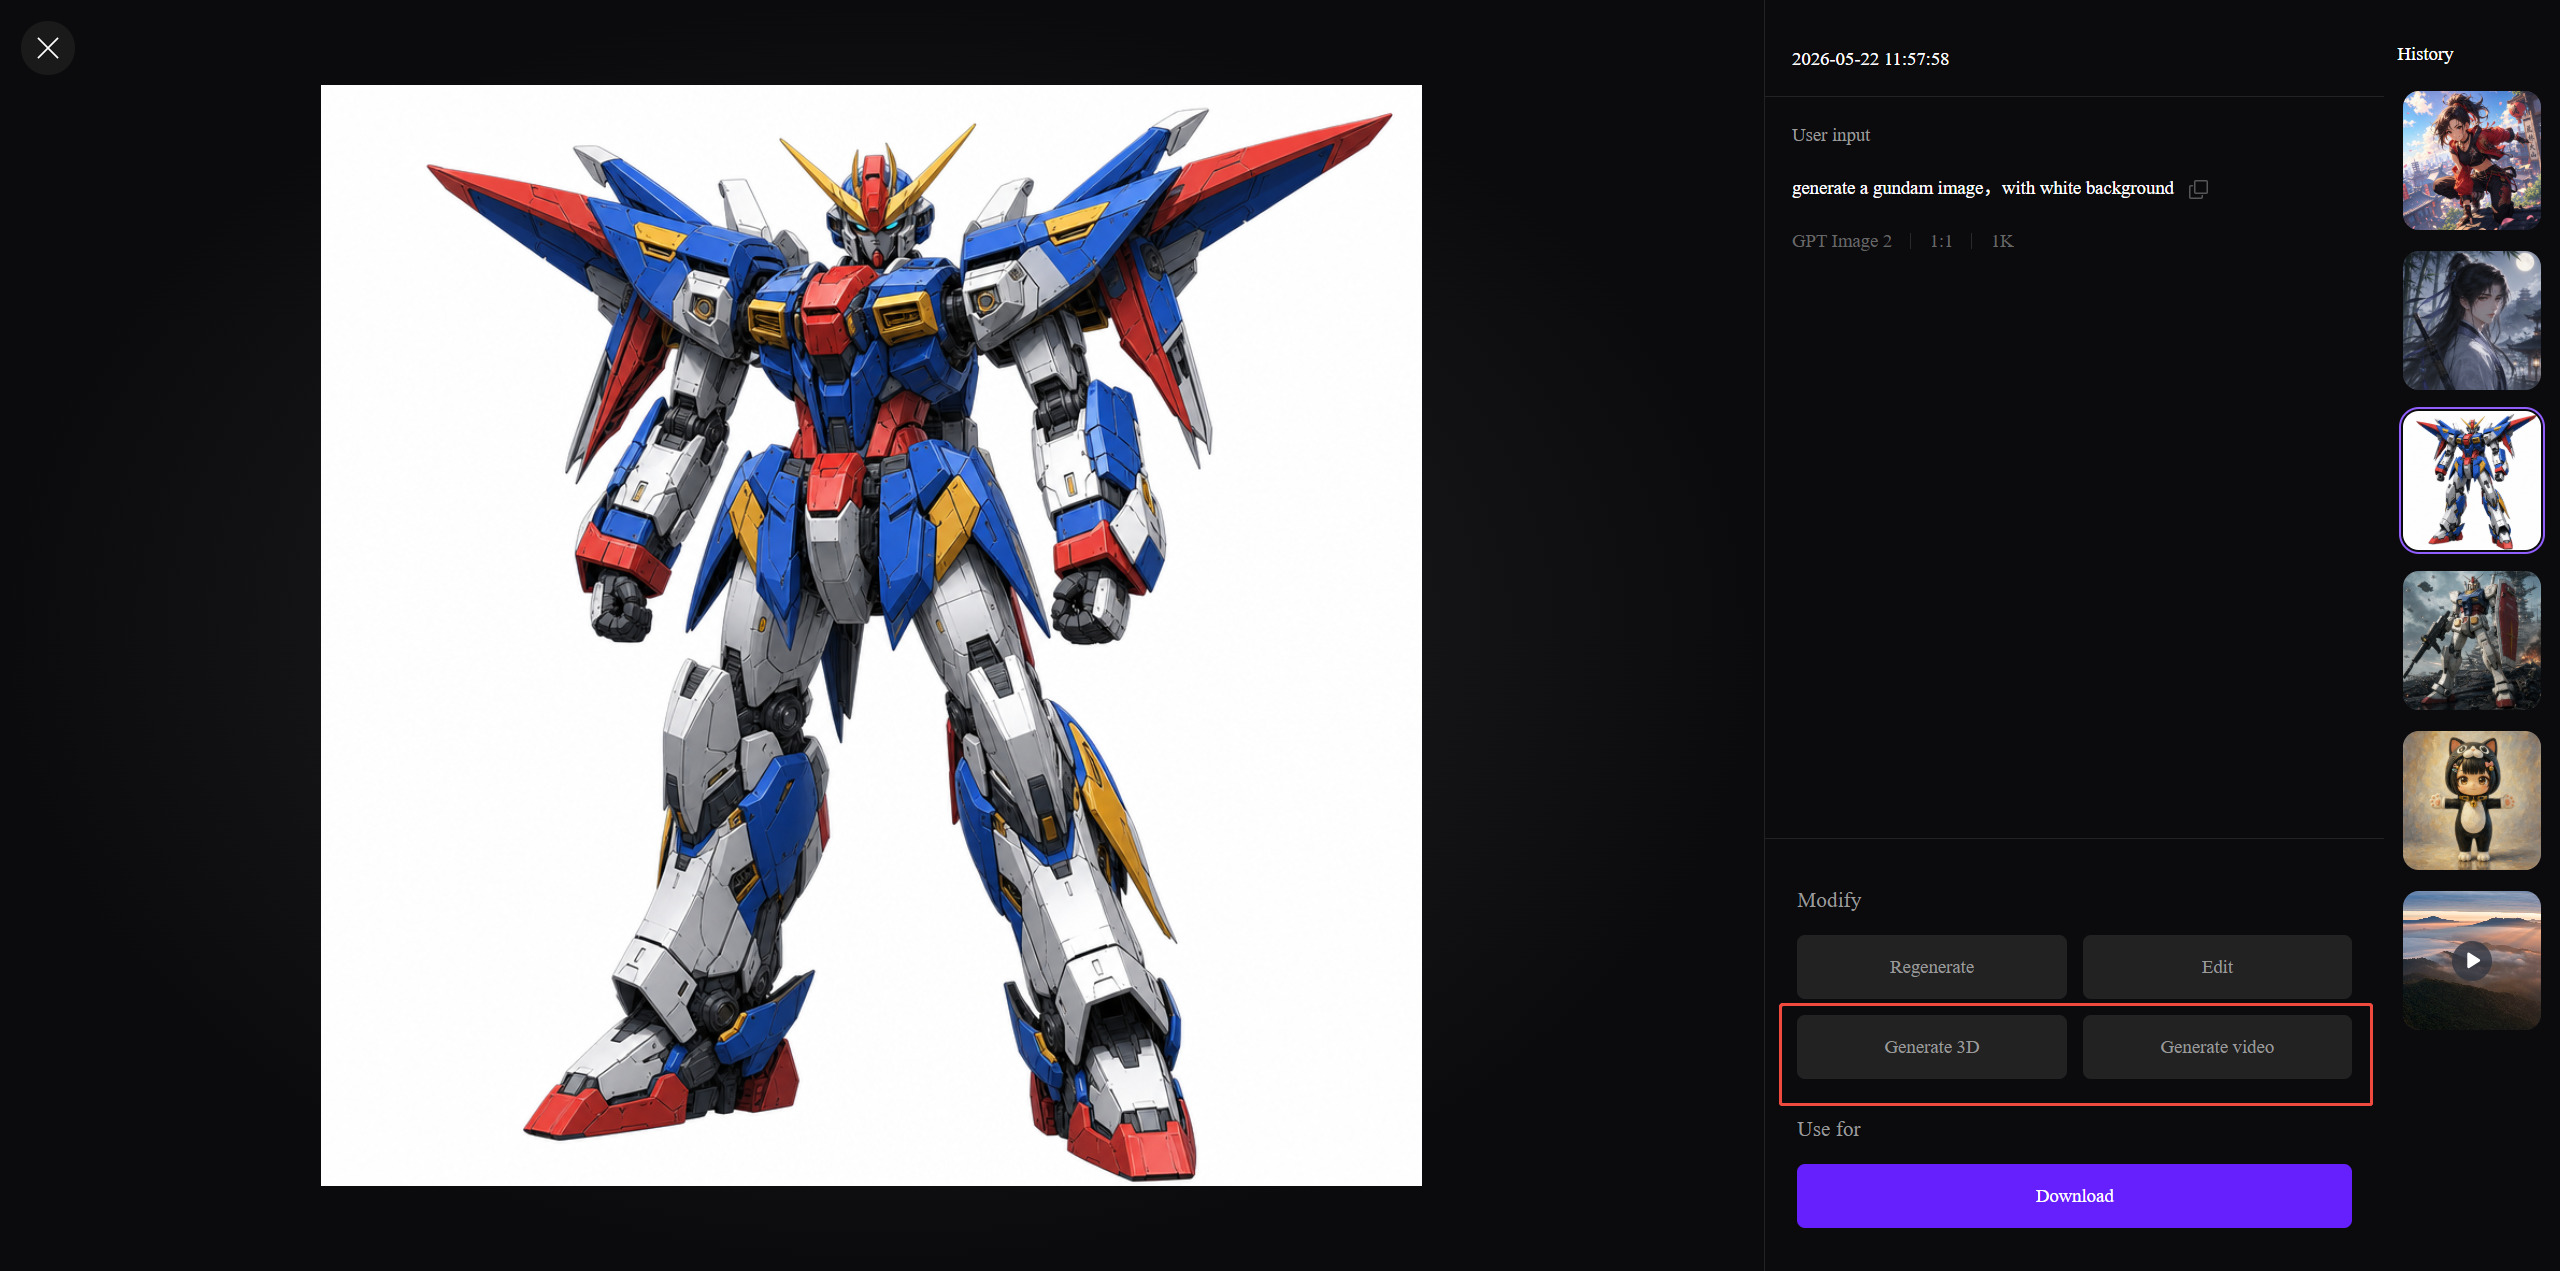
Yes. Neural4D Studio allows you to seamlessly feed your generated 2D images directly into downstream 3D modeling and video animation pipelines.
To generate a 3D asset from your 2D image, click on the generated image to open the preview modal, then click the Generate 3D button in the bottom-right corner. The system will automatically redirect you to the Image to 3D Studio with your image loaded as the reference. Simply configure your desired mesh settings and click generate to create a watertight 3D model. For detailed instructions, refer to the How to Use the Image to 3D Feature guide.
For 3D printing workflows, this is the recommended path: configure your options to create a watertight model, and then export the reconstructed mesh directly as an .stl file to slice in your FDM or SLA slicer.
To animate your 2D image, click on the generated image to open the preview modal, then click the Generate Video button in the bottom-right corner. This redirects you to the AI Video Generator, automatically carrying your image over as the video's starting reference frame. Enter a descriptive video prompt detailing the movement, camera motion, or effects you want to apply, and click Generate Video to render a short, production-ready video clip (for details, see the How to Use Text to Video tutorial).
Paid subscribers receive a full commercial license for every image generated on Neural4D, including any 3D models or video clips derived from those images. You can use the outputs in client deliverables, product listings, ad campaigns, or print production without additional licensing fees.
Free-plan outputs are tagged as Trial and are limited to personal, non-commercial use. To unlock commercial rights, upgrade via the Pricing page. Free users receive 50 Power per week, which is sufficient for several generation runs.
Try Neural4D for Free'%3e%3cg%3e%3cpath%20d='M14.22126,2L16.980341,2L10.922359,8.365314L18,17.000000999999997L12.44585,17.000000999999997L8.0973005,11.7527676L3.1189604,17.000000999999997L0.35988006,17.000000999999997L6.7777414,10.1918821L0,2L5.6921029,2L9.6207924,6.7933583L14.22126,2ZM13.255582,15.505536L14.785071,15.505536L4.88837,3.4391145L3.2449181,3.4391145L13.255582,15.505536Z'%20fill='%23ffffff'%20fill-opacity='1'%20style='mix-blend-mode:passthrough'/%3e%3c/g%3e%3c/g%3e%3c/svg%3e)
'%3e%3cg%3e%3cg%3e%3cpath%20d='M17.776579953674315,4.238972914697266C18.530987953674316,2.8357112146972656,17.668764953674316,1.0000038146972656,17.668764953674316,1.0000038146972656C15.728984953674317,1.0000038146972656,14.327326953674316,2.2953194146972655,14.327326953674316,2.2953194146972655C13.572919953674317,1.8635447646972656,11.093512553674316,1.8635447646972656,11.093512553674316,1.8635447646972656C11.093512553674316,1.8635447646972656,8.614197253674316,1.8635447646972656,7.859790753674316,2.2953194146972655C7.859790753674316,2.2953194146972655,6.4587898536743165,1.0000038146972656,4.518257353674317,1.0000038146972656C4.518257353674317,1.0000038146972656,3.6561312536743165,2.8350313146972654,4.410538953674316,4.238972914697266C4.410538953674316,4.238972914697266,2.6862124236743163,5.858135714697266,3.332825653674316,9.312969214697265C3.9408041536743164,12.559363814697265,6.782133553674316,13.415479814697266,8.614197253674316,13.415479814697266C8.614197253674316,13.415479814697266,7.859790753674316,14.063154814697265,7.967603653674316,15.142524814697266C7.967603653674316,15.142524814697266,6.889853453674316,15.790198814697266,5.812196053674317,15.358415814697265C4.734538553674316,14.926723814697265,4.1956536536743165,13.847263814697266,4.1956536536743165,13.847263814697266C4.1956536536743165,13.847263814697266,3.1179590536743165,12.443964814697265,2.0402743556743164,12.983694814697266C2.0402743556743164,12.983694814697266,1.7169677936743164,13.307532814697266,2.9024282136743165,13.847263814697266C2.9024282136743165,13.847263814697266,3.7645722536743165,15.142524814697266,4.087878753674316,15.898144814697266C4.411195253674316,16.653767814697268,6.135446553674316,17.301444814697266,7.860446953674316,16.869661814697267L7.860446953674316,19.352327814697265C7.860446953674316,19.352327814697265,7.860446953674316,19.568219814697265,7.4293847536743165,19.676166814697265C6.998322453674317,19.784110814697264,6.998322453674317,20.000003814697266,7.213853853674316,20.000003814697266L14.974576953674317,20.000003814697266C15.190109953674316,20.000003814697266,15.190109953674316,19.784110814697264,14.759046953674316,19.676166814697265C14.327983953674316,19.568219814697265,14.327983953674316,19.352327814697265,14.327983953674316,19.352327814697265L14.327983953674316,16.869661814697267C14.327983953674316,16.869661814697267,14.337451953674316,15.575053814697265,14.327983953674316,15.142524814697266C14.304263953674317,14.057753814697266,13.573576953674316,13.415479814697266,13.573576953674316,13.415479814697266C15.405640953674316,13.415479814697266,18.246925953674317,12.559363814697265,18.854893953674317,9.312969214697265C19.501579953674316,5.858135714697266,17.777234953674316,4.238972914697266,17.776579953674315,4.238972914697266L17.776579953674315,4.238972914697266Z'%20fill='%23ffffff'%20fill-opacity='1'%20style='mix-blend-mode:passthrough'/%3e%3c/g%3e%3c/g%3e%3c/g%3e%3c/svg%3e)


