
The Text to 3D tool in Neural4D allows you to generate deterministic, production-ready 3D models using natural language prompts. Follow these precise steps to translate your text descriptions into accurate geometry for furniture design, 3D printing assets, or professional product visualization.
Directly go to the Text to 3D studio. Or, you can navigate to the Products section from the top navigation bar to enter the 3D Studio. In the left sidebar toolbar, click on the Text to 3D option.
In the main workspace, locate the text input box. To ensure the engine computes the exact topology and material properties, we recommend using a structured input method:
| Input Method | Description & Logic |
|---|---|
| Manual Prompting | Structure your prompt using the formula: [Subject] + [Structural Details] + [Materials] + [Style]. |
| "Give it a try" | Click this option located near the input area to immediately test the engine's capabilities without writing a prompt from scratch. For more inspiration, check out our guide on 10 Neural4D Prompts You Should Try for 3D Assets. |
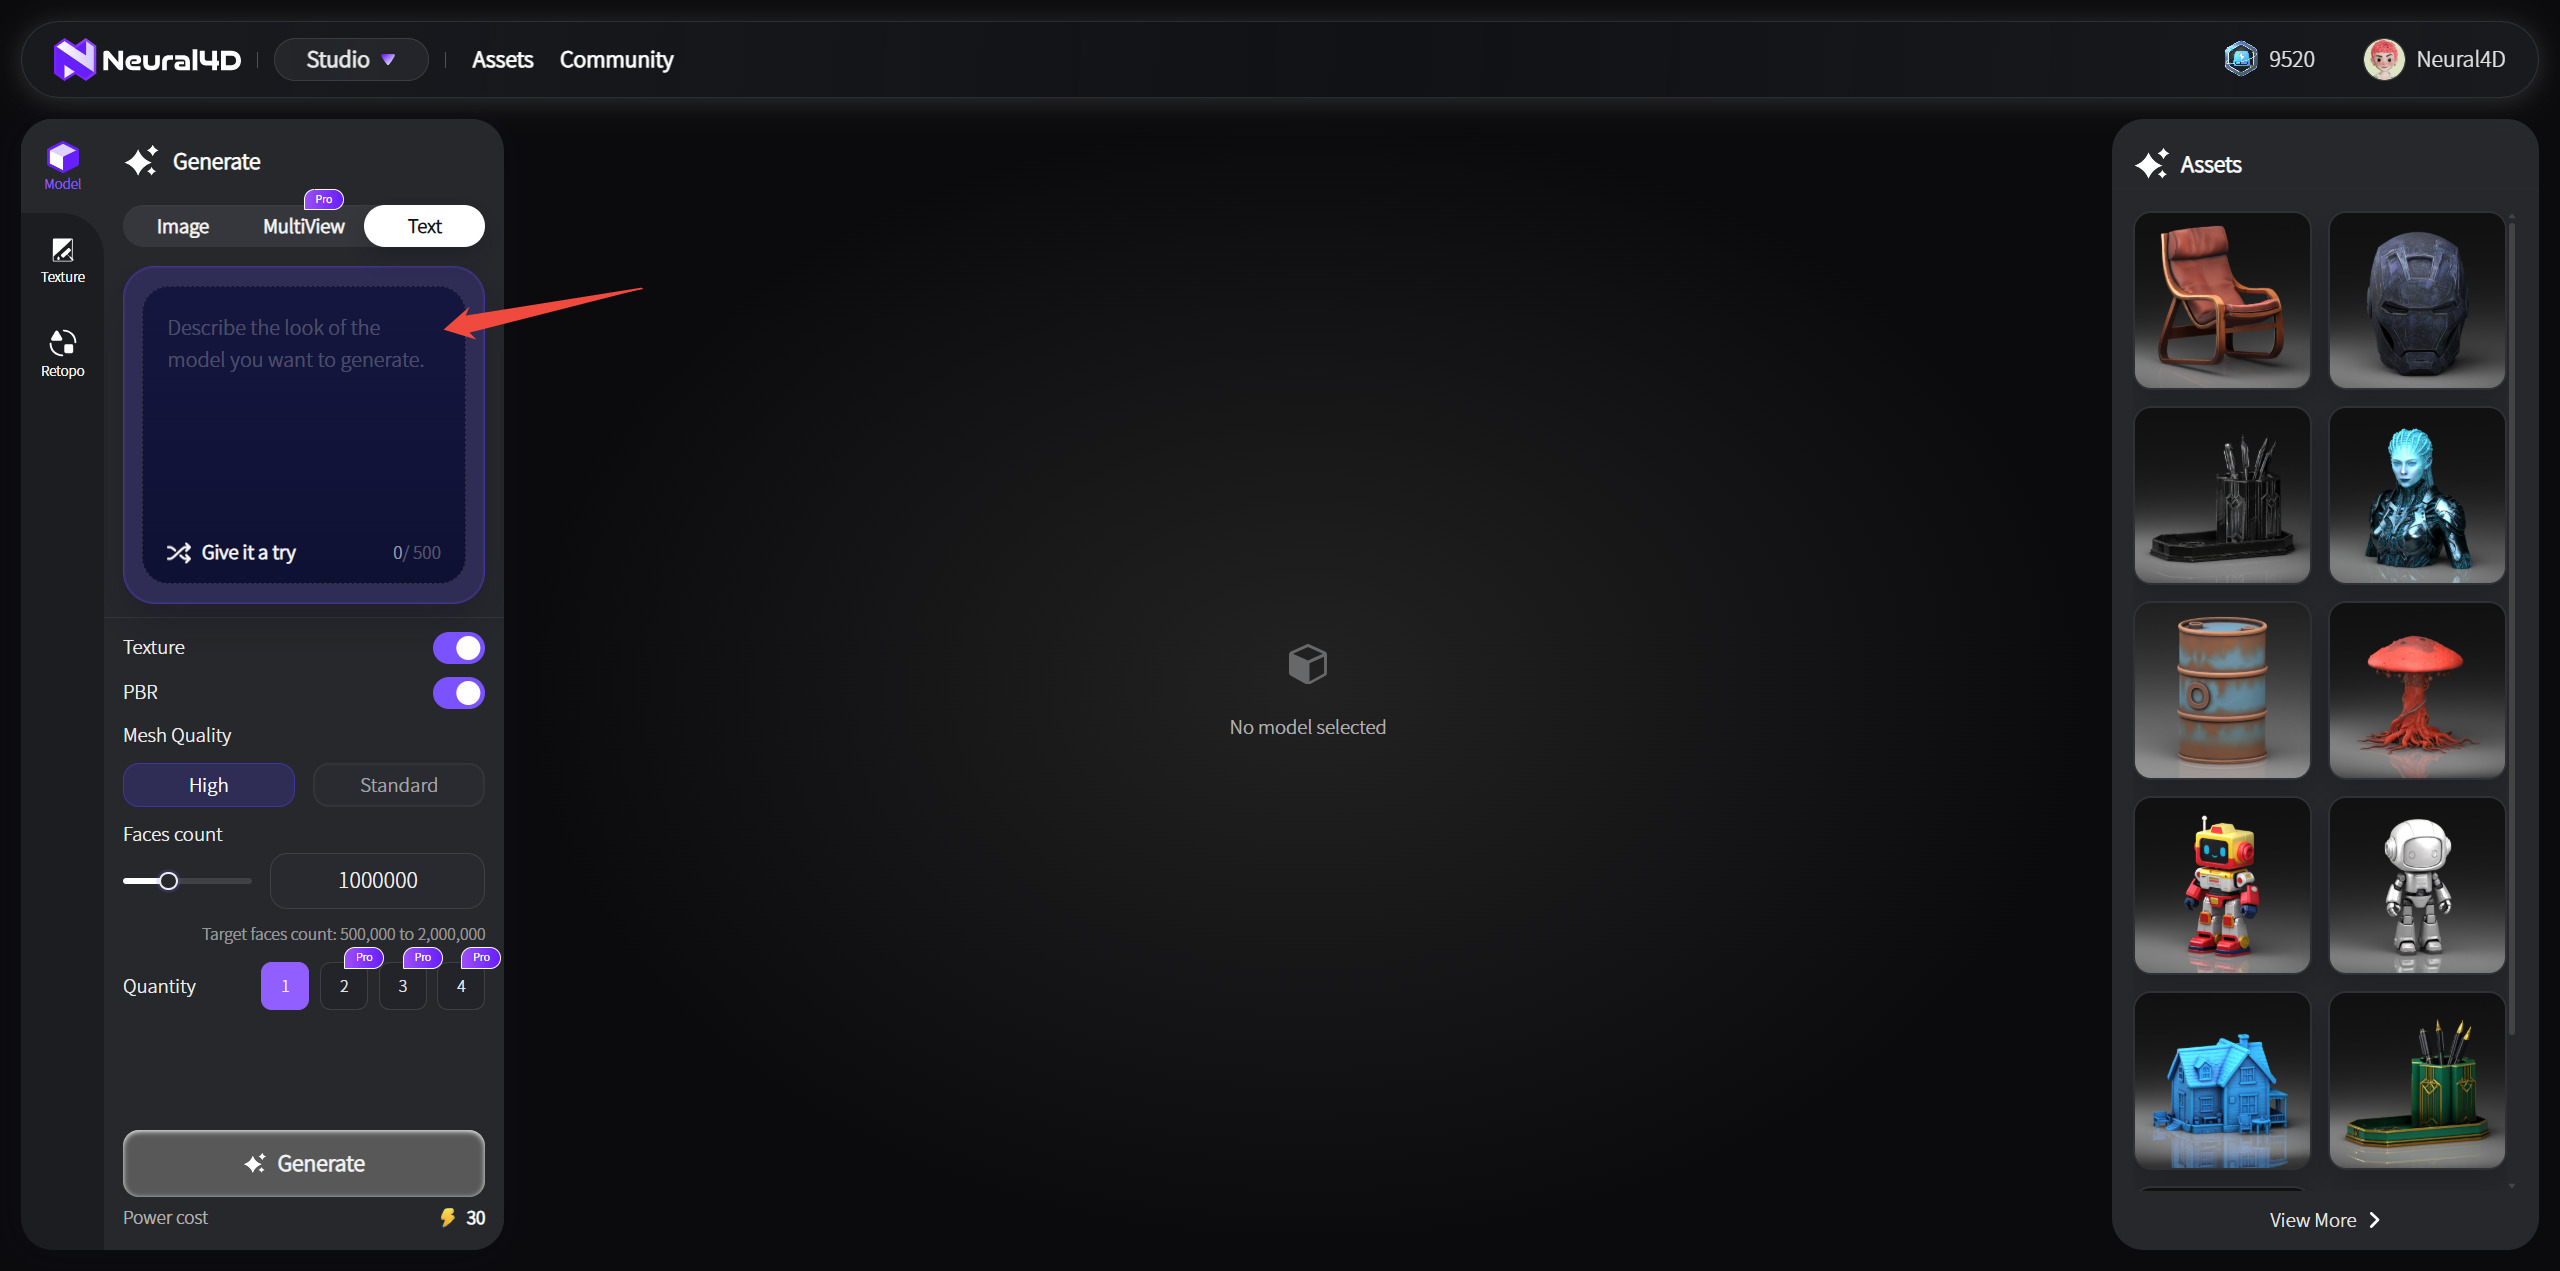
Before initiating the generation, select whether the system should generate textures.
Please note: Generating an untextured base mesh takes approximately 90 seconds. If you enable standard textures or a full set of PBR (Physically Based Rendering) maps, the processing will require additional computation time.
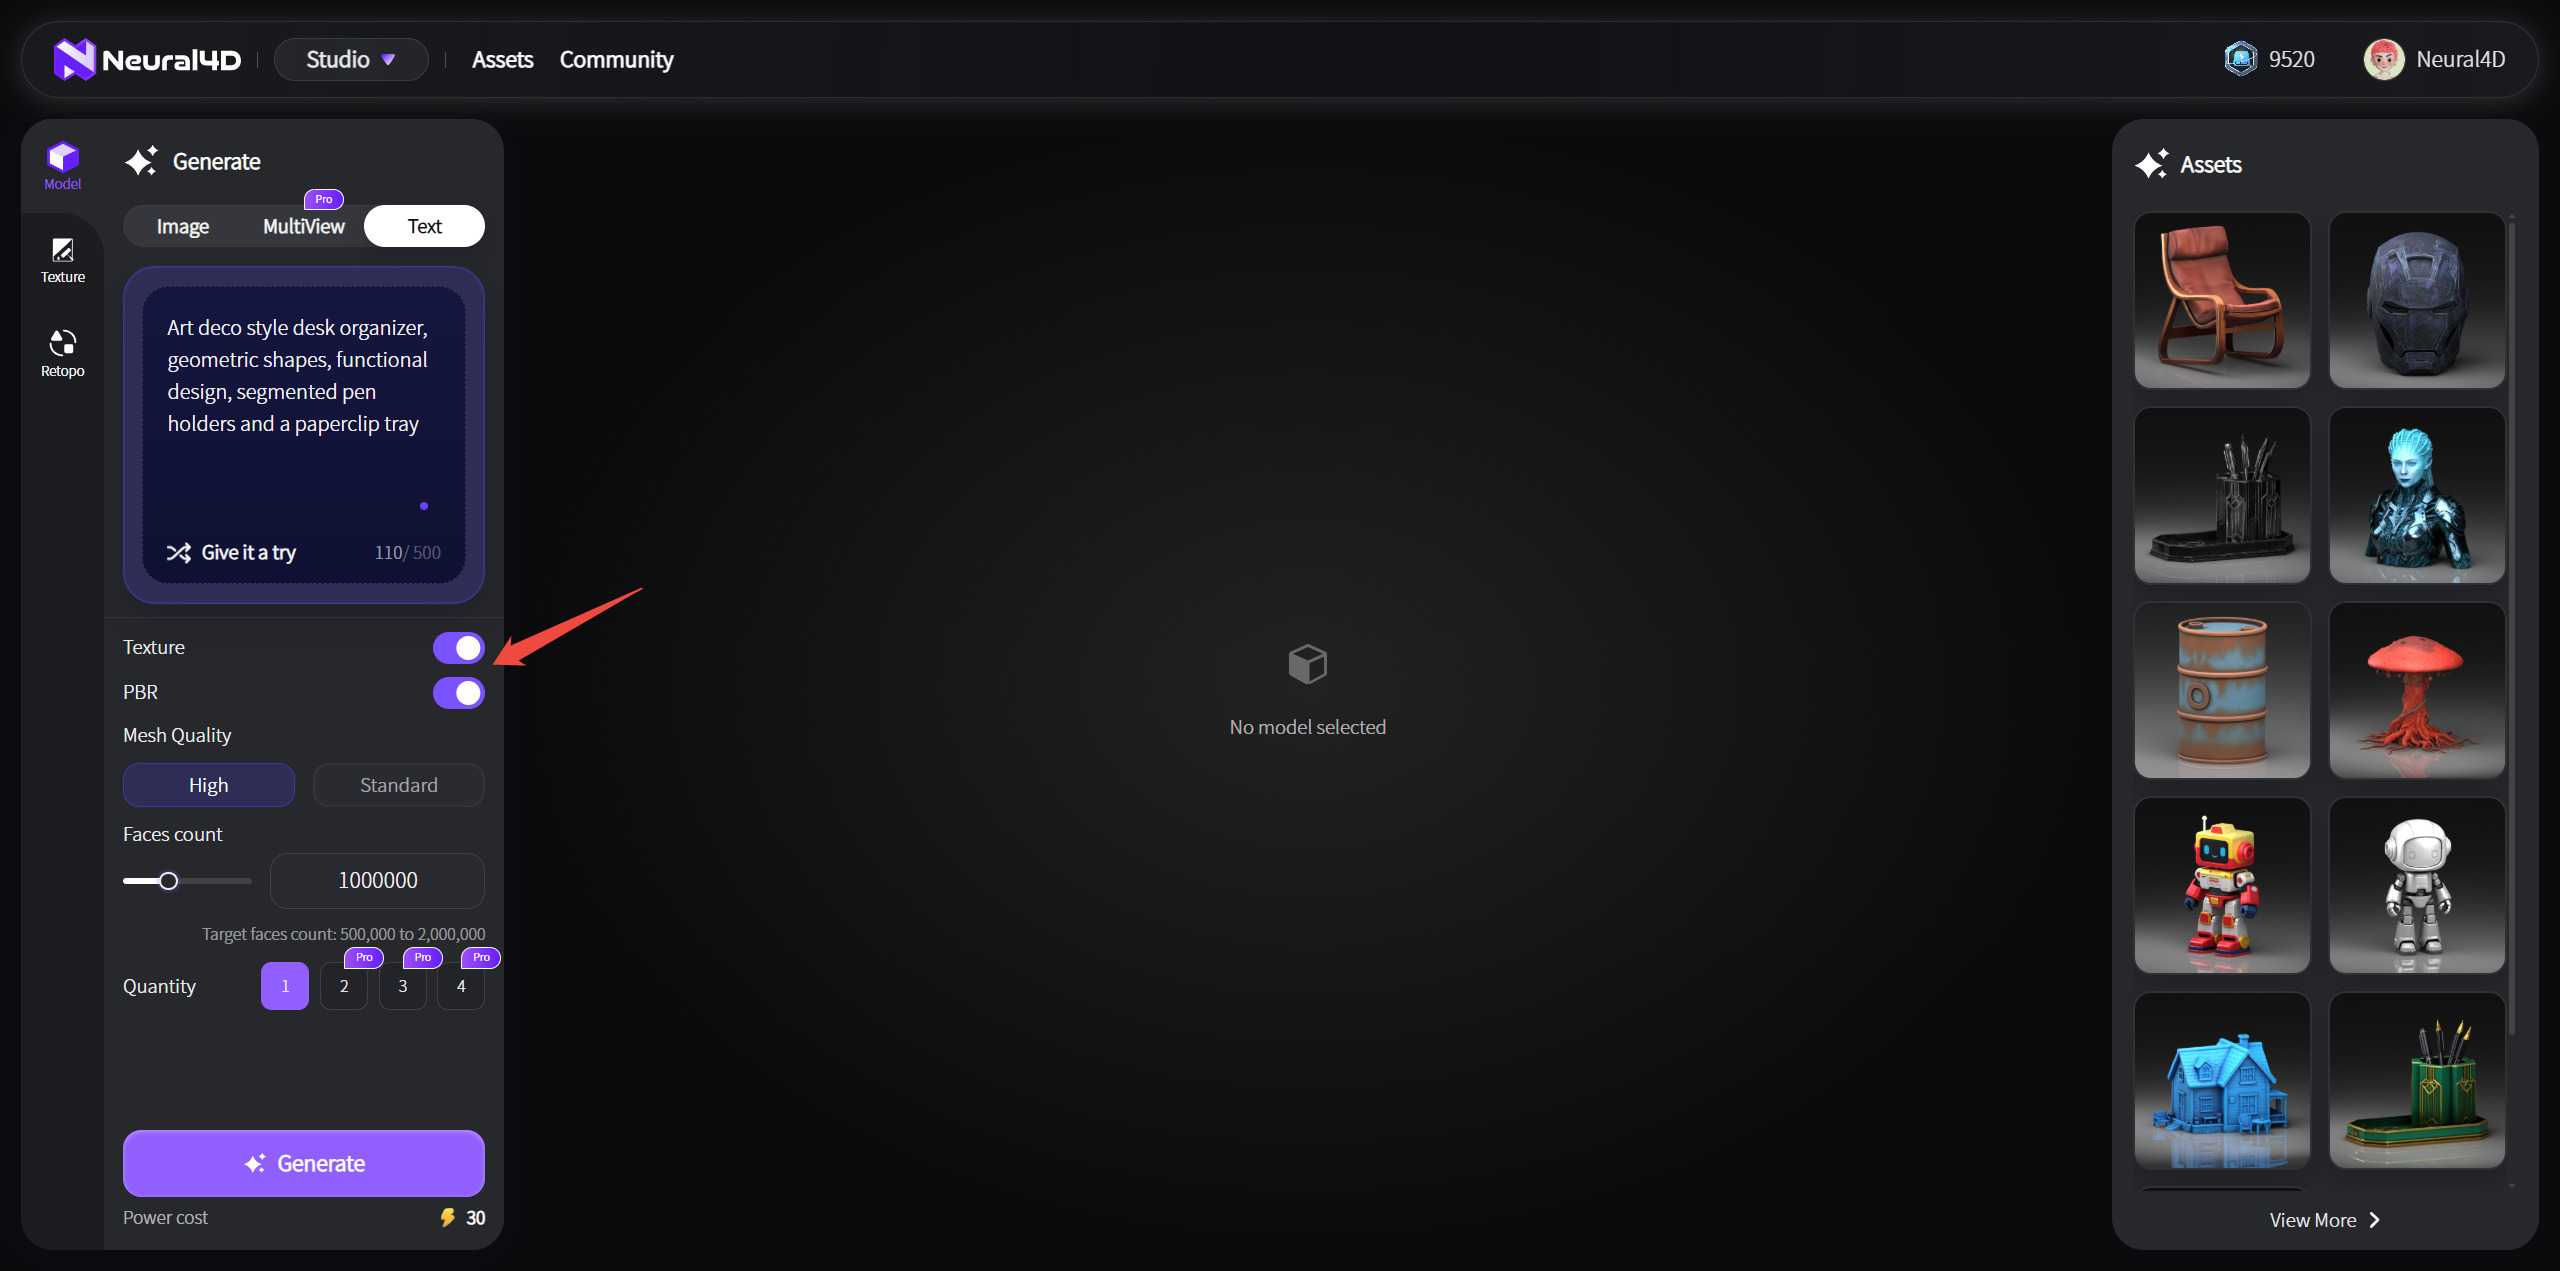
Click the Generate button. The engine will process your prompt and construct the geometry. Once completed, the fully realized 3D model will appear in the main workspace on the right side of your screen. You can use your mouse to pan, zoom, and rotate to inspect the mesh structure and topology in real-time.
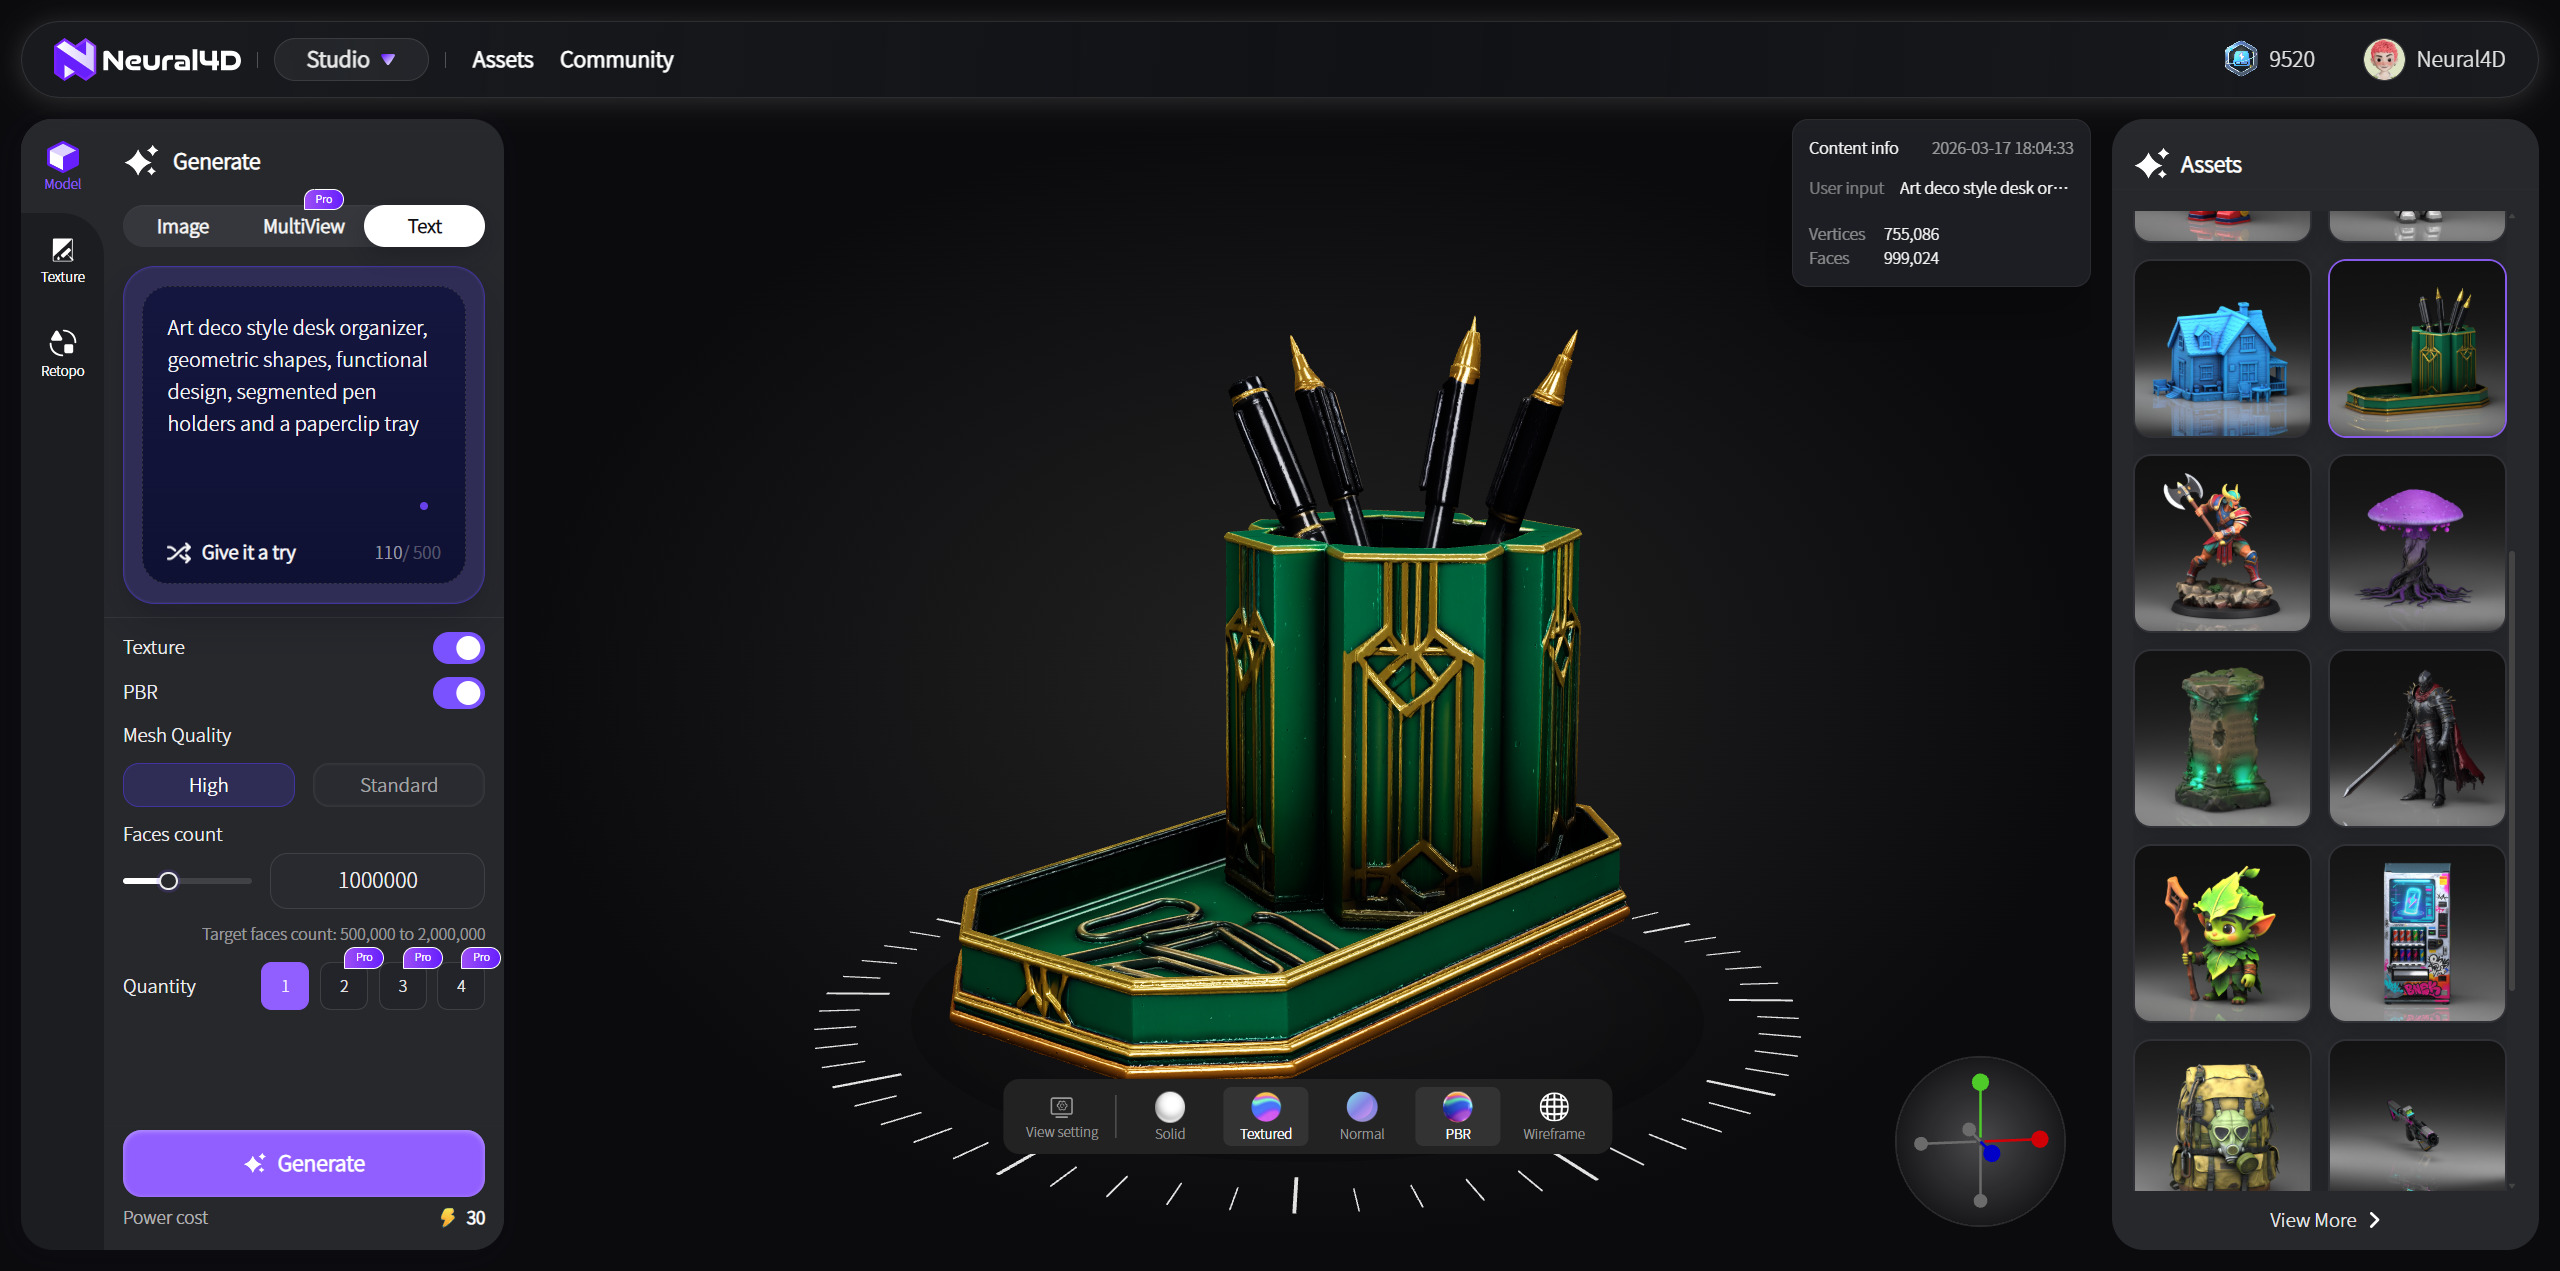
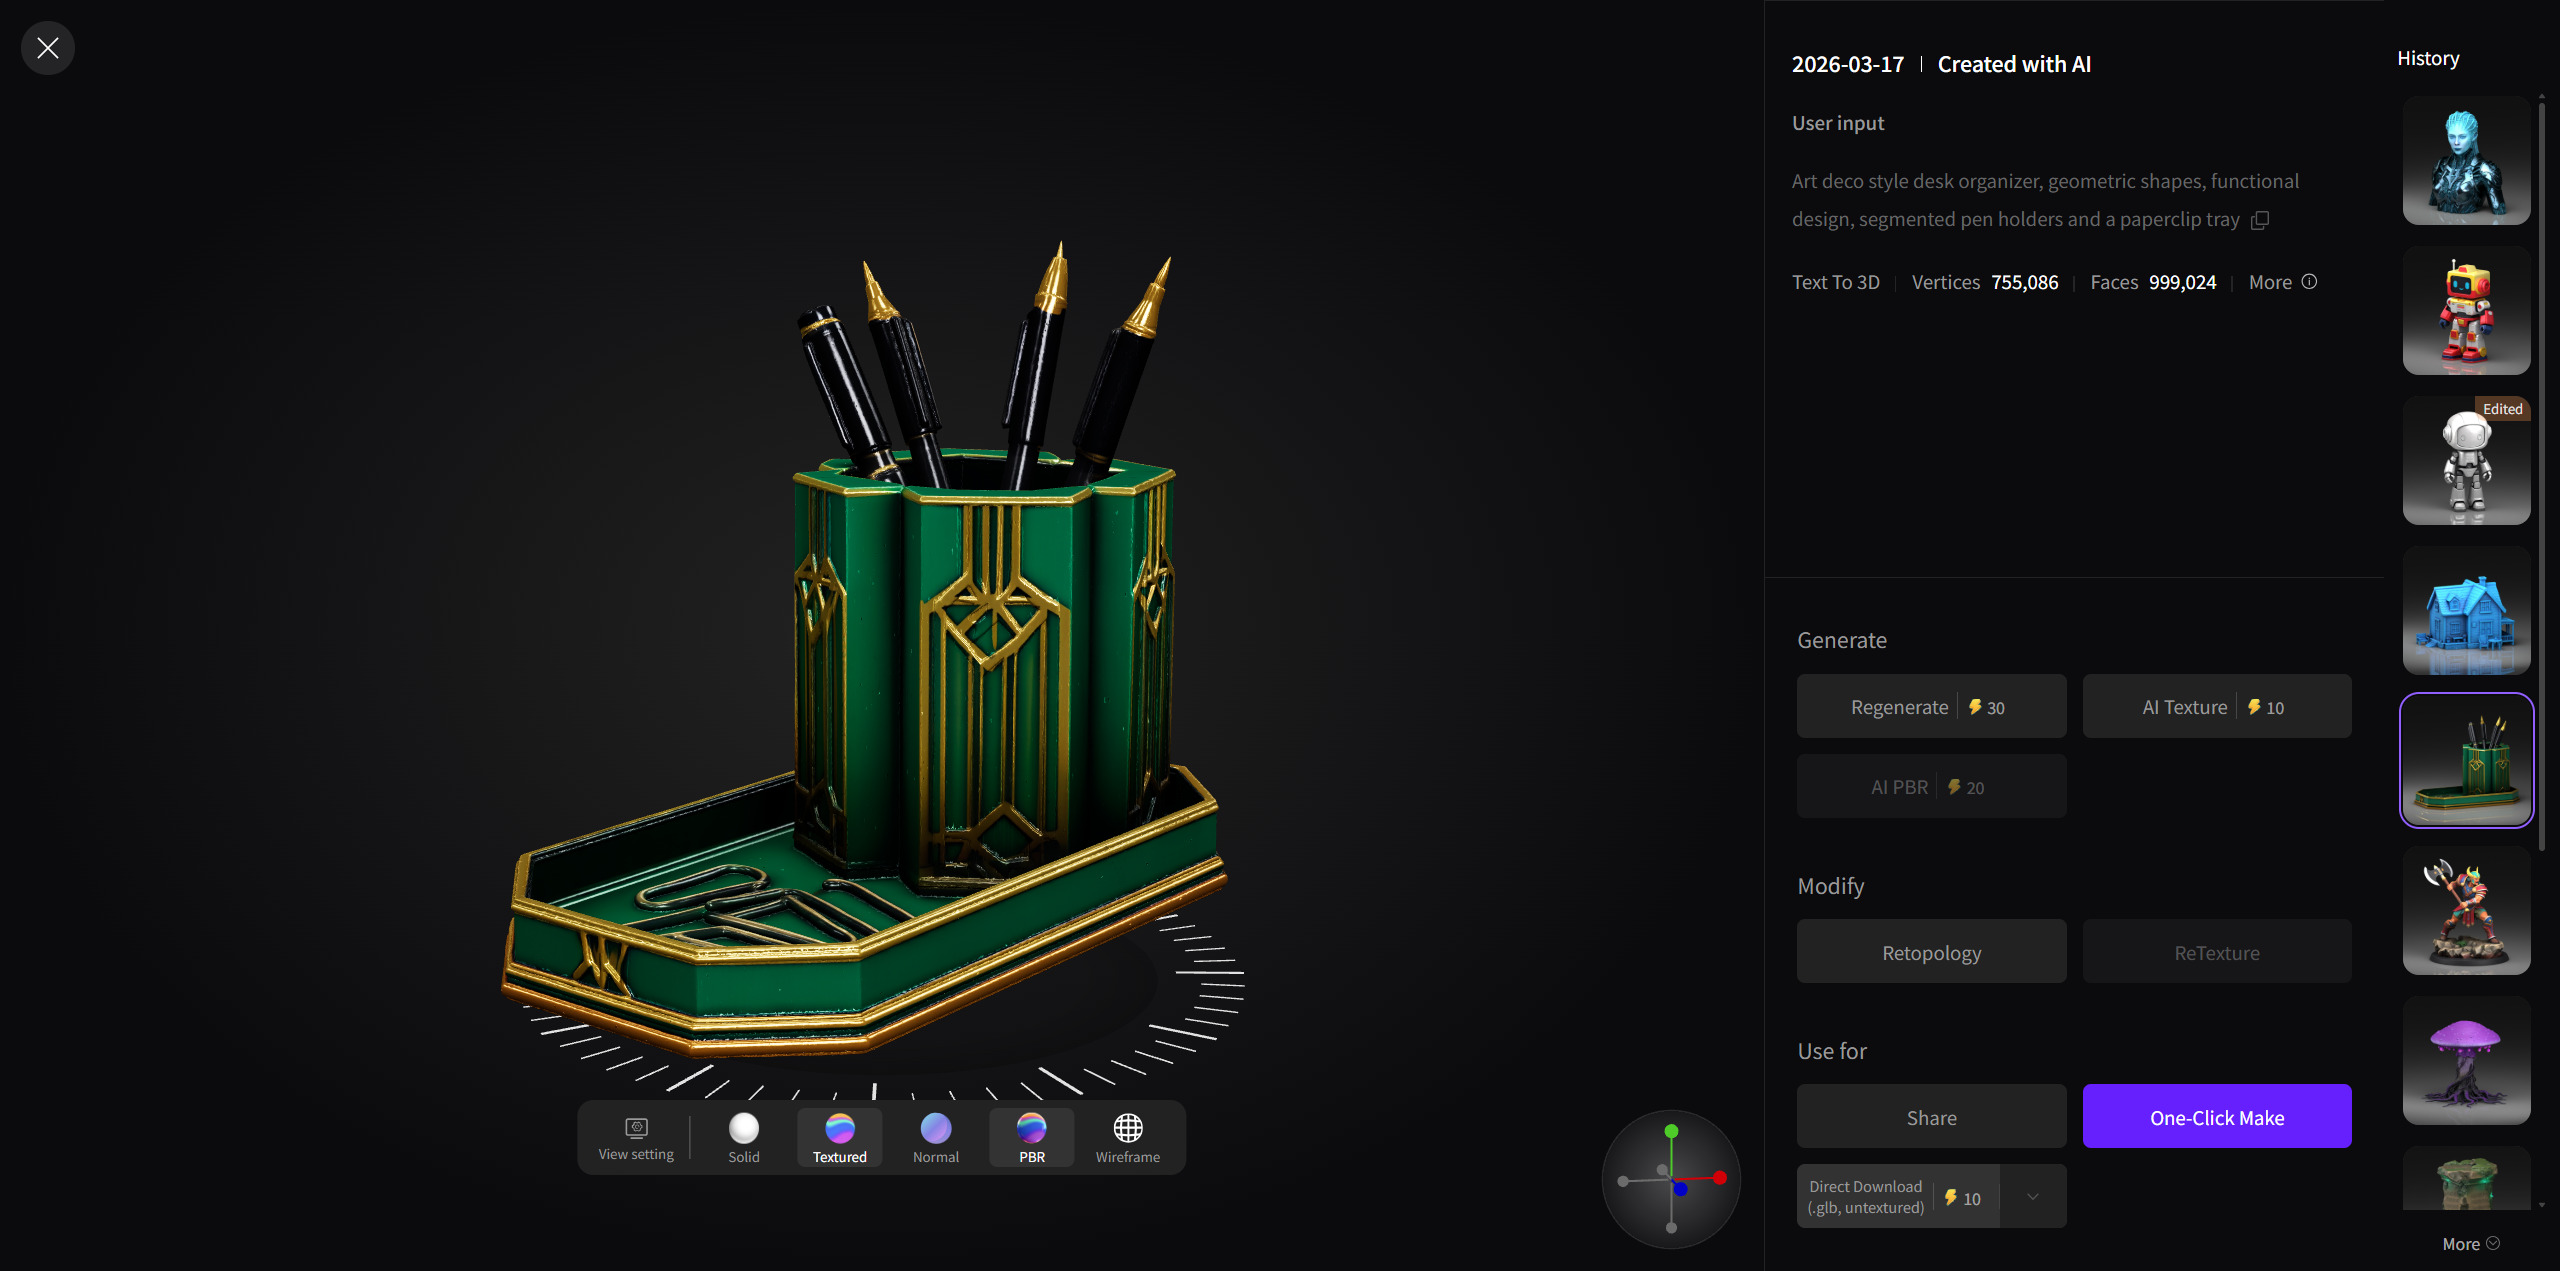
Review your generated asset and choose the next steps based on your production requirements:
| Action | Description & Next Steps |
|---|---|
| Refine Model | If the initial geometry or texture requires adjustment, select N4D-2o (Interactive 3D Generation) from the left sidebar. You can use conversational commands to iteratively modify specific details. |
| Export Asset | If the model meets your requirements, click the export icon to download the asset in formats like .obj, .fbx, .glb, .usdz, .stl, or .blend. |
| Physical 3D Printing | For physical prototyping or model production, Neural4D offers direct 3D printing services. Click the One-Click Make button or contact our support team with material requirements and dimensions. |
All generated digital files are automatically saved and can be accessed anytime via the Assets tab in the left toolbar.
| Your Goal | Recommended Solution |
|---|---|
| Already have a photo? | Use our Image to 3D feature to convert photos into meshes. |
| Scale your production? | Learn how to automate this workflow via the Neural4D API. |
'%3e%3cg%3e%3cpath%20d='M14.22126,2L16.980341,2L10.922359,8.365314L18,17.000000999999997L12.44585,17.000000999999997L8.0973005,11.7527676L3.1189604,17.000000999999997L0.35988006,17.000000999999997L6.7777414,10.1918821L0,2L5.6921029,2L9.6207924,6.7933583L14.22126,2ZM13.255582,15.505536L14.785071,15.505536L4.88837,3.4391145L3.2449181,3.4391145L13.255582,15.505536Z'%20fill='%23ffffff'%20fill-opacity='1'%20style='mix-blend-mode:passthrough'/%3e%3c/g%3e%3c/g%3e%3c/svg%3e)
'%3e%3cg%3e%3cg%3e%3cpath%20d='M17.776579953674315,4.238972914697266C18.530987953674316,2.8357112146972656,17.668764953674316,1.0000038146972656,17.668764953674316,1.0000038146972656C15.728984953674317,1.0000038146972656,14.327326953674316,2.2953194146972655,14.327326953674316,2.2953194146972655C13.572919953674317,1.8635447646972656,11.093512553674316,1.8635447646972656,11.093512553674316,1.8635447646972656C11.093512553674316,1.8635447646972656,8.614197253674316,1.8635447646972656,7.859790753674316,2.2953194146972655C7.859790753674316,2.2953194146972655,6.4587898536743165,1.0000038146972656,4.518257353674317,1.0000038146972656C4.518257353674317,1.0000038146972656,3.6561312536743165,2.8350313146972654,4.410538953674316,4.238972914697266C4.410538953674316,4.238972914697266,2.6862124236743163,5.858135714697266,3.332825653674316,9.312969214697265C3.9408041536743164,12.559363814697265,6.782133553674316,13.415479814697266,8.614197253674316,13.415479814697266C8.614197253674316,13.415479814697266,7.859790753674316,14.063154814697265,7.967603653674316,15.142524814697266C7.967603653674316,15.142524814697266,6.889853453674316,15.790198814697266,5.812196053674317,15.358415814697265C4.734538553674316,14.926723814697265,4.1956536536743165,13.847263814697266,4.1956536536743165,13.847263814697266C4.1956536536743165,13.847263814697266,3.1179590536743165,12.443964814697265,2.0402743556743164,12.983694814697266C2.0402743556743164,12.983694814697266,1.7169677936743164,13.307532814697266,2.9024282136743165,13.847263814697266C2.9024282136743165,13.847263814697266,3.7645722536743165,15.142524814697266,4.087878753674316,15.898144814697266C4.411195253674316,16.653767814697268,6.135446553674316,17.301444814697266,7.860446953674316,16.869661814697267L7.860446953674316,19.352327814697265C7.860446953674316,19.352327814697265,7.860446953674316,19.568219814697265,7.4293847536743165,19.676166814697265C6.998322453674317,19.784110814697264,6.998322453674317,20.000003814697266,7.213853853674316,20.000003814697266L14.974576953674317,20.000003814697266C15.190109953674316,20.000003814697266,15.190109953674316,19.784110814697264,14.759046953674316,19.676166814697265C14.327983953674316,19.568219814697265,14.327983953674316,19.352327814697265,14.327983953674316,19.352327814697265L14.327983953674316,16.869661814697267C14.327983953674316,16.869661814697267,14.337451953674316,15.575053814697265,14.327983953674316,15.142524814697266C14.304263953674317,14.057753814697266,13.573576953674316,13.415479814697266,13.573576953674316,13.415479814697266C15.405640953674316,13.415479814697266,18.246925953674317,12.559363814697265,18.854893953674317,9.312969214697265C19.501579953674316,5.858135714697266,17.777234953674316,4.238972914697266,17.776579953674315,4.238972914697266L17.776579953674315,4.238972914697266Z'%20fill='%23ffffff'%20fill-opacity='1'%20style='mix-blend-mode:passthrough'/%3e%3c/g%3e%3c/g%3e%3c/svg%3e)
'%3e%3cg%3e%3cg%3e%3cpath%20d='M17.776579953674315,4.238972914697266C18.530987953674316,2.8357112146972656,17.668764953674316,1.0000038146972656,17.668764953674316,1.0000038146972656C15.728984953674317,1.0000038146972656,14.327326953674316,2.2953194146972655,14.327326953674316,2.2953194146972655C13.572919953674317,1.8635447646972656,11.093512553674316,1.8635447646972656,11.093512553674316,1.8635447646972656C11.093512553674316,1.8635447646972656,8.614197253674316,1.8635447646972656,7.859790753674316,2.2953194146972655C7.859790753674316,2.2953194146972655,6.4587898536743165,1.0000038146972656,4.518257353674317,1.0000038146972656C4.518257353674317,1.0000038146972656,3.6561312536743165,2.8350313146972654,4.410538953674316,4.238972914697266C4.410538953674316,4.238972914697266,2.6862124236743163,5.858135714697266,3.332825653674316,9.312969214697265C3.9408041536743164,12.559363814697265,6.782133553674316,13.415479814697266,8.614197253674316,13.415479814697266C8.614197253674316,13.415479814697266,7.859790753674316,14.063154814697265,7.967603653674316,15.142524814697266C7.967603653674316,15.142524814697266,6.889853453674316,15.790198814697266,5.812196053674317,15.358415814697265C4.734538553674316,14.926723814697265,4.1956536536743165,13.847263814697266,4.1956536536743165,13.847263814697266C4.1956536536743165,13.847263814697266,3.1179590536743165,12.443964814697265,2.0402743556743164,12.983694814697266C2.0402743556743164,12.983694814697266,1.7169677936743164,13.307532814697266,2.9024282136743165,13.847263814697266C2.9024282136743165,13.847263814697266,3.7645722536743165,15.142524814697266,4.087878753674316,15.898144814697266C4.411195253674316,16.653767814697268,6.135446553674316,17.301444814697266,7.860446953674316,16.869661814697267L7.860446953674316,19.352327814697265C7.860446953674316,19.352327814697265,7.860446953674316,19.568219814697265,7.4293847536743165,19.676166814697265C6.998322453674317,19.784110814697264,6.998322453674317,20.000003814697266,7.213853853674316,20.000003814697266L14.974576953674317,20.000003814697266C15.190109953674316,20.000003814697266,15.190109953674316,19.784110814697264,14.759046953674316,19.676166814697265C14.327983953674316,19.568219814697265,14.327983953674316,19.352327814697265,14.327983953674316,19.352327814697265L14.327983953674316,16.869661814697267C14.327983953674316,16.869661814697267,14.337451953674316,15.575053814697265,14.327983953674316,15.142524814697266C14.304263953674317,14.057753814697266,13.573576953674316,13.415479814697266,13.573576953674316,13.415479814697266C15.405640953674316,13.415479814697266,18.246925953674317,12.559363814697265,18.854893953674317,9.312969214697265C19.501579953674316,5.858135714697266,17.777234953674316,4.238972914697266,17.776579953674315,4.238972914697266L17.776579953674315,4.238972914697266Z'%20fill='%23ffffff'%20fill-opacity='1'%20style='mix-blend-mode:passthrough'/%3e%3c/g%3e%3c/g%3e%3c/g%3e%3c/svg%3e)


