
We designed Neural4D to generate structurally sound, watertight geometry. Because our engine calculates high-density native 3D meshes rather than quick approximations, the resulting assets are highly suitable for physical fabrication. You can also explore our dedicated AI for 3D Printing feature page for more details.
This guide outlines the workflow to export your Neural4D model and prepare it for your slicing software.
To transition from a digital asset to a physical print, you must download the correct file type from the Neural4D studio. Navigate to Assets → Select your model → Click Download and choose the appropriate format.
| Format | Description |
|---|---|
| Standard 3D Printing (.stl) | We highly recommend exporting your model as an .stl file for standard FDM (Fused Deposition Modeling) or SLA (Stereolithography) resin printing. The .stl format is the universal standard for 3D printing. It strips away all PBR textures and lighting data, focusing exclusively on the raw surface geometry required by the printer. |
| Full-Color 3D Printing (.obj) | If you are using an advanced multi-color printer (such as PolyJet or Binder Jetting technology), export your model as an .obj file. This format retains the spatial data alongside the necessary material references required for color printing. |
FMI: How to Convert Image to STL File for 3D Printing →

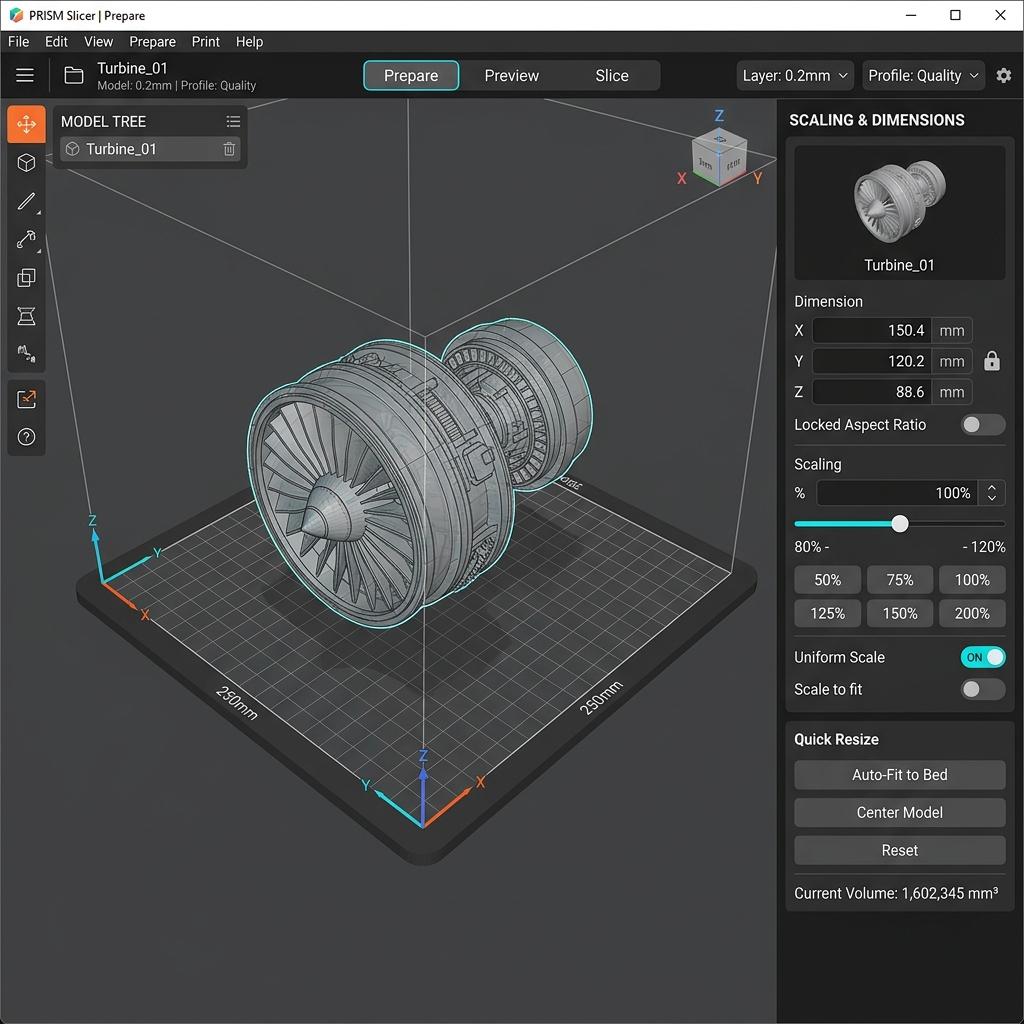
Neural4D generates models at a standardized relative scale. You must define the absolute physical dimensions inside your slicing software (such as Ultimaker Cura, PrusaSlicer, or Chitubox).
| Action | Description |
|---|---|
| Step 1 | Drag and drop your downloaded .stl or .obj file into your slicer's build plate environment. |
| Step 2 | Select the model and open the scaling tool. |
| Step 3 | Input your desired absolute dimensions (typically in millimeters). Ensure uniform scaling is locked so the model does not stretch or warp on a single axis. |
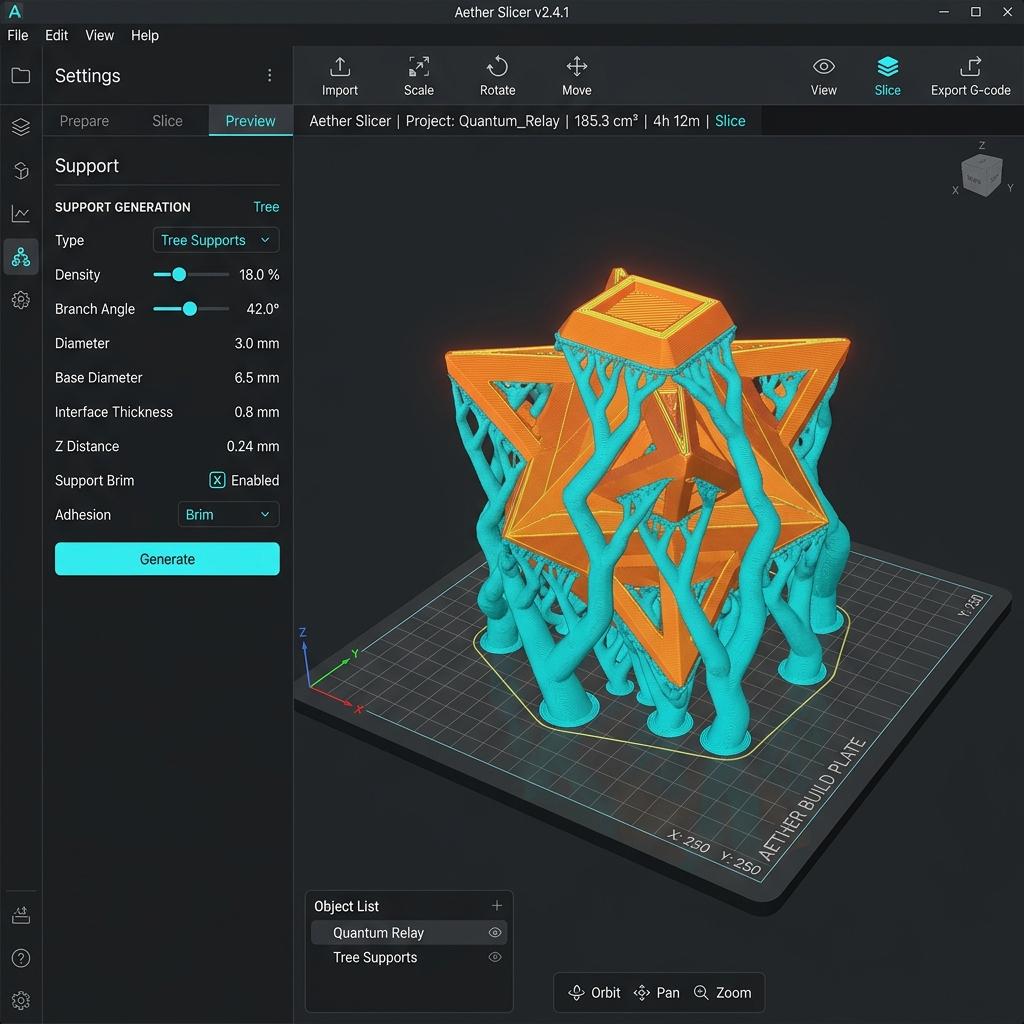
While Neural4D produces mathematically clean topology, the physical constraints of 3D printing still apply. You need to manage overhangs and bed adhesion.
| Phase | Action |
|---|---|
| Orientation | Rotate the model on the build plate to find the optimal printing angle. Your goal is to minimize the cross-sectional area of extreme overhangs. For resin printing, angle the model (typically between 30 and 45 degrees) to reduce suction cup forces against the FEP film. |
| Support Structures | Once oriented, utilize your slicer's support generation tool. Check the preview carefully to ensure all floating islands and steep overhangs are supported before generating your G-code or sliced file. |
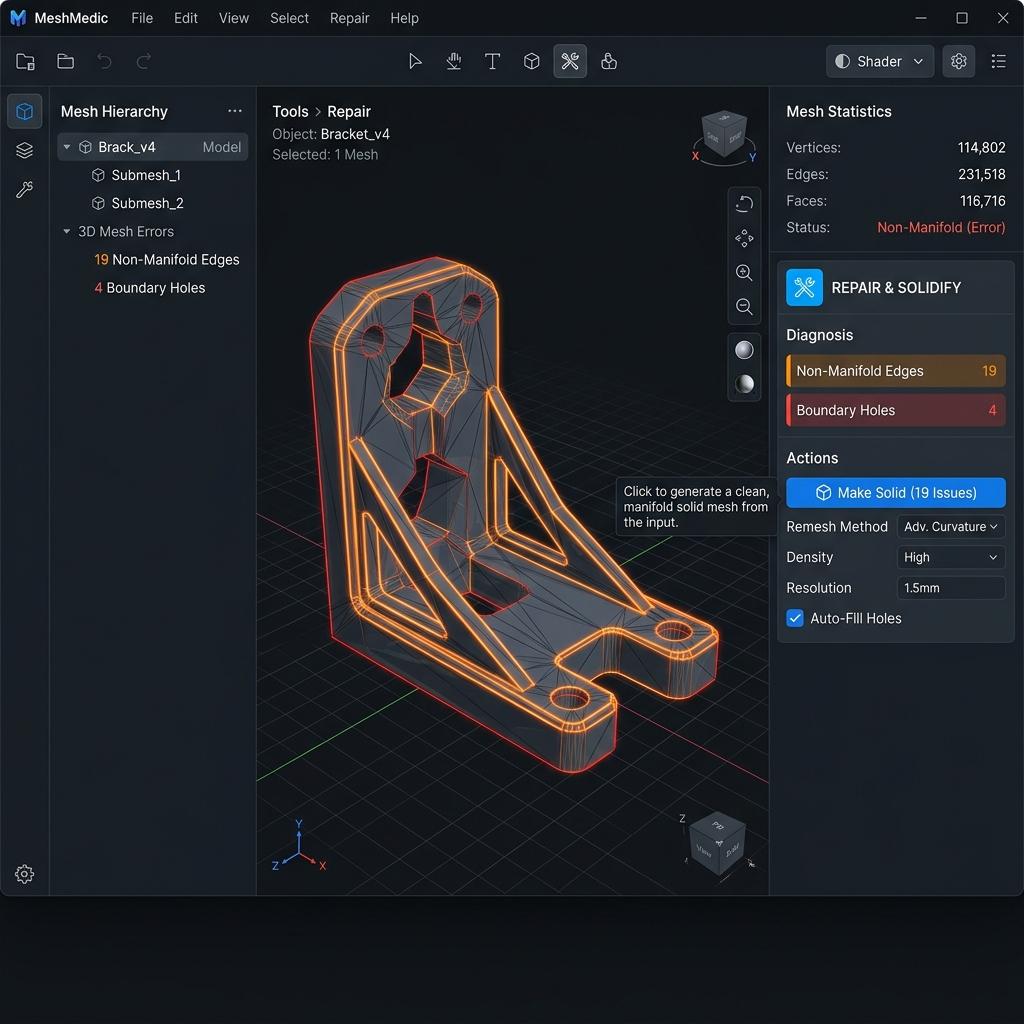
Our native 3D generation process outputs watertight volumes with minimal non-manifold edges. A watertight mesh is a strict requirement for 3D printing; otherwise, the slicer cannot distinguish the inside of the model from the outside.
Most modern slicers perform an automatic geometry check upon import. If your slicer flags any localized topological issues, simply use the software's built-in repair utility (such as the "Fix through Netfabb" function in PrusaSlicer or the "Make Solid" tool in Meshmixer) to close any micro-holes before printing.
Have a question or ran into an issue not covered here? Visit our Feedback page and let us know – we read every message.
'%3e%3cg%3e%3cpath%20d='M14.22126,2L16.980341,2L10.922359,8.365314L18,17.000000999999997L12.44585,17.000000999999997L8.0973005,11.7527676L3.1189604,17.000000999999997L0.35988006,17.000000999999997L6.7777414,10.1918821L0,2L5.6921029,2L9.6207924,6.7933583L14.22126,2ZM13.255582,15.505536L14.785071,15.505536L4.88837,3.4391145L3.2449181,3.4391145L13.255582,15.505536Z'%20fill='%23ffffff'%20fill-opacity='1'%20style='mix-blend-mode:passthrough'/%3e%3c/g%3e%3c/g%3e%3c/svg%3e)
'%3e%3cg%3e%3cg%3e%3cpath%20d='M17.776579953674315,4.238972914697266C18.530987953674316,2.8357112146972656,17.668764953674316,1.0000038146972656,17.668764953674316,1.0000038146972656C15.728984953674317,1.0000038146972656,14.327326953674316,2.2953194146972655,14.327326953674316,2.2953194146972655C13.572919953674317,1.8635447646972656,11.093512553674316,1.8635447646972656,11.093512553674316,1.8635447646972656C11.093512553674316,1.8635447646972656,8.614197253674316,1.8635447646972656,7.859790753674316,2.2953194146972655C7.859790753674316,2.2953194146972655,6.4587898536743165,1.0000038146972656,4.518257353674317,1.0000038146972656C4.518257353674317,1.0000038146972656,3.6561312536743165,2.8350313146972654,4.410538953674316,4.238972914697266C4.410538953674316,4.238972914697266,2.6862124236743163,5.858135714697266,3.332825653674316,9.312969214697265C3.9408041536743164,12.559363814697265,6.782133553674316,13.415479814697266,8.614197253674316,13.415479814697266C8.614197253674316,13.415479814697266,7.859790753674316,14.063154814697265,7.967603653674316,15.142524814697266C7.967603653674316,15.142524814697266,6.889853453674316,15.790198814697266,5.812196053674317,15.358415814697265C4.734538553674316,14.926723814697265,4.1956536536743165,13.847263814697266,4.1956536536743165,13.847263814697266C4.1956536536743165,13.847263814697266,3.1179590536743165,12.443964814697265,2.0402743556743164,12.983694814697266C2.0402743556743164,12.983694814697266,1.7169677936743164,13.307532814697266,2.9024282136743165,13.847263814697266C2.9024282136743165,13.847263814697266,3.7645722536743165,15.142524814697266,4.087878753674316,15.898144814697266C4.411195253674316,16.653767814697268,6.135446553674316,17.301444814697266,7.860446953674316,16.869661814697267L7.860446953674316,19.352327814697265C7.860446953674316,19.352327814697265,7.860446953674316,19.568219814697265,7.4293847536743165,19.676166814697265C6.998322453674317,19.784110814697264,6.998322453674317,20.000003814697266,7.213853853674316,20.000003814697266L14.974576953674317,20.000003814697266C15.190109953674316,20.000003814697266,15.190109953674316,19.784110814697264,14.759046953674316,19.676166814697265C14.327983953674316,19.568219814697265,14.327983953674316,19.352327814697265,14.327983953674316,19.352327814697265L14.327983953674316,16.869661814697267C14.327983953674316,16.869661814697267,14.337451953674316,15.575053814697265,14.327983953674316,15.142524814697266C14.304263953674317,14.057753814697266,13.573576953674316,13.415479814697266,13.573576953674316,13.415479814697266C15.405640953674316,13.415479814697266,18.246925953674317,12.559363814697265,18.854893953674317,9.312969214697265C19.501579953674316,5.858135714697266,17.777234953674316,4.238972914697266,17.776579953674315,4.238972914697266L17.776579953674315,4.238972914697266Z'%20fill='%23ffffff'%20fill-opacity='1'%20style='mix-blend-mode:passthrough'/%3e%3c/g%3e%3c/g%3e%3c/g%3e%3c/svg%3e)


